Screen recording is a process of recording the activities on the screen of your computer or mobile device. It can be used for various purposes, such as to capture a video tutorial, record a game, or screencast software demonstrations. Windows 10 has many features, but one of the most popular is the ability to record your screen. In this article, we’ll see how to record screen in Windows 10.
What is Screen Recording User For?
Screen recording captures everything you do on your Windows PC for a specific period. Working professionals use screen recordings in various office environments to communicate a particular execution or training.
Many gaming professionals use such tools for training, testing, and sharing their gaming achievements. Trainers use screen recording software to share their training.
Did you know that one of the most important roles of screen recorders is to provide clarity about the business requirements that we need to run?
Here is an example-
You are working with a product development team, and there are many requirements to develop all those features listed in the requirements. Sometimes, requirements are not clear to us, and because of this, there is a delay in implementing the required features. So, to rectify such issues, we have to clarify and understand them clearly. If not, we need screen recording software to briefly explain and share the running project with the respective product development team members.
It will boost the confidence of the product development team and reduce the period with negligible defects.
Easy Guide - How to Record Screen in Windows 10?
Here are the easy steps.
- You need to get an ActivePresenter for your Windows 10.
- After installing, start ActivePresenter, which will initialize in a few seconds.

3. In the left sidebar is a feature for ‘Record Video.’

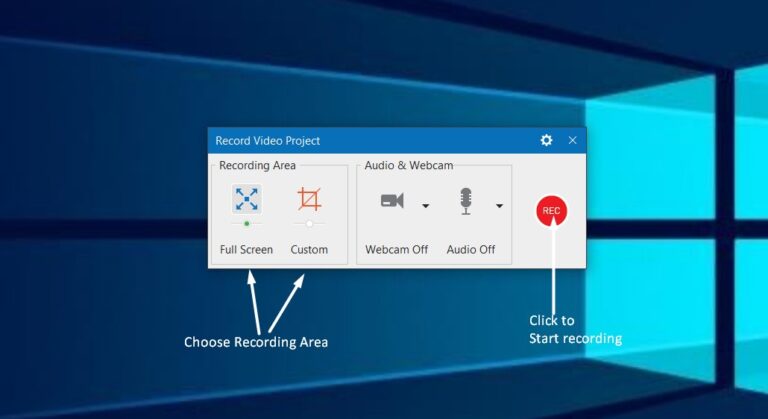
4. Click on ‘Record Video,’ and it will open a popup with available options
- You can select the recording area as needed, like Custom or Full Screen.
- It consists of inbuilt Audio & Webcam options for your recordings.
5. Now, to start recording, click the Red button, which will run the Recording.

How to Record Screen in Windows 10 Video
Valuable Methods for Recording Screen on Windows PC
Method 1. Built-in Screen Recorder: Xbox Game Bar
A step-by-step guide to using Xbox Game Bar:
Windows 10 has a built-in screen recorder and Xbox Game Bar. It’s free and easy to use, mainly designed for recording games, but it works for any app.
How to Use Xbox Game Bar:
Step 1: Press Windows + G on your keyboard to open the Xbox Game Bar.
Step 2: Once the Game Bar is open, click on the Capture button (it looks like a camera).
Step 3: A small capture box will appear. To start recording, press the red Record button.
Step 4: To stop Recording, click on the Game Bar’s stop button or press Windows + Alt + R on your keyboard.
Step 5: Your recorded video will be saved automatically in the Videos folder under Captures.
Limitations of Xbox Game Bar:
- Xbox Game Bar cannot be recorded on the desktop or in File Explorer.
- It may not work well on older computers.
Method 2. Using Free Third-Party Software
Many free software options make screen recording easy. Some popular ones include OBS Studio and FlashBack Express.
How to Use OBS Studio:
OBS Studio is a powerful tool often used by gamers and streamers.
Steps:
Step 1: Download and install OBS Studio from its official website.
Step 2: Open OBS Studio and click + under the Sources box.
Step 3: Select Display Capture to record your screen.
Step 4: Click Start Recording to begin.
Step 5: When you’re done, click Stop Recording. Your video will be saved in the location you choose.
How to Use FlashBack Express:
FlashBack Express is more accessible for beginners. It offers simple controls and doesn’t require complicated settings.
Steps:
Step 1: Download and install FlashBack Express.
Step 2: Open the software and select whether to record your screen, a specific window, or just your webcam.
Step 3: Click Start Recording to begin and Stop Recording when you’re done.
Method 3. Record Screen with Microsoft PowerPoint
Did you know you can record your screen using PowerPoint? This is a lesser-known feature but valuable for presentations.
How to Use PowerPoint for Screen Recording:
Step 1: Open PowerPoint and click on the Insert tab.
Step 2: Select Screen Recording from the menu.
Step 3: Choose the area of your screen you want to record.
Step 4: Click Record and start your task.
Step 5: Click the stop button when you’re finished, and PowerPoint will add the Recording to the slide.
Step 6: You can save the Recording as a video file by right-clicking on it and choosing Save Media As.
Screen Recording Tips
- Here are some valuable tips to make your screen recording look professional:
- Plan Ahead: Before recording, plan what you want to show.
- Clear the Screen: Close unnecessary windows and hide desktop icons to keep the Recording neat.
- Use a Microphone: If you’re recording a tutorial, using a microphone to explain what you’re doing can be very helpful.
- Check Settings: Make sure your screen recording tool is set to the right quality, and check the audio settings if you’re speaking.
Final Thoughts
Screen recording in Windows 10 is a valuable skill for creating top-class tutorials, capturing gameplay, or saving online meetings. Whether you use the built-in Xbox Game Bar for quick recordings or opt for more advanced tools like OBS Studio, Windows 10 offers easy solutions for all needs. Third-party software like Camtasia or Bandicam also provides extra features for professional editing. With the above guide, you can easily start recording your screen with high-quality results. Remember to check system requirements and adjust settings for optimal performance. Now that you know the best methods, go ahead and capture your screen effortlessly!
Frequently Asked Questions
Question 1: Can I record my whole screen using the Xbox Game Bar?
Answer: No, Xbox Game Bar can only record individual apps or games, not your entire desktop or File Explorer.
Question 2: Is OBS Studio free to use?
Answer: Yes, OBS Studio is completely free and provides high-quality screen recording.
Question 3: Can I record my voice while recording the screen?
Answer: All the methods mentioned above allow you to record your voice using a microphone.
Question 4: Where are my recordings saved?
Answer: Recordings for the Xbox Game Bar are saved in the Videos > Captures folder. OBS Studio and FlashBack Express let you choose where to save your recordings.
Question 5: Does Recording affect the computer’s performance?
Answer: If your computer has low specifications, screen recording might slow it down. To free up resources, it’s best to close unnecessary programs.
Share


