OP Auto Clicker for PC and Gaming
OP Auto Clicker automates mouse clicks with minimal efforts. A popular open-source, lightweight clicking tool fully compatible with Windows.
What is an OP Auto Clicker?
An OP Auto Clicker for PC and Gaming is a superior open-source automation macro for Windows. It is designed to save you time and boost your digital productivity with accurate and simple control.
It performs repetitive mouse clicks and serves as your personal tech assistant. You can achieve millisecond-level accuracy, target specific areas, and adjust parameters.
This application easily adapts to your needs, whether you are a professional seeking faster processes, a regular gamer, or a user seeking accessibility support.
lessen physical strain and increase productivity. Installing an auto-clicker lets you remove “busy work” and concentrate on essential tasks and free time by automating repetitive operations with 100% reliability.
Discover why it remains the primary go-to for anyone seeking contemporary, high-performance automation by experiencing the ideal balance of power and simplicity through its user-friendly interface.
Features of Auto Clicker Software
It consists of a range of features that allow the end user to tailor the clicking experience to their specific needs:

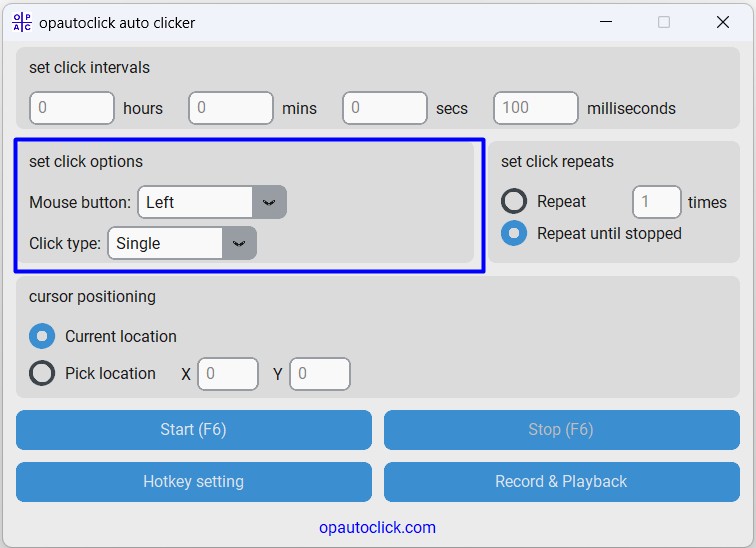
Set Click Intervals
As a user, you can set the required click intervals in hours, minutes, seconds, and milliseconds. When making clicks, the opautoclicker will adhere to these timings.
Set Click Options
Now, it’s depends on you to decide whether to use the left, middle, or right mouse button and whether to use a single or double click.
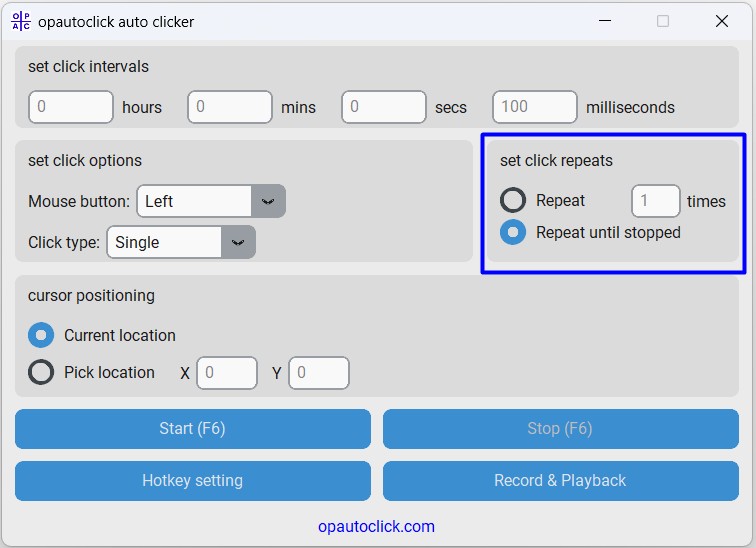
Set Click Repeats
Think about whether to repeat clicks a specified number of times or until the user stops.
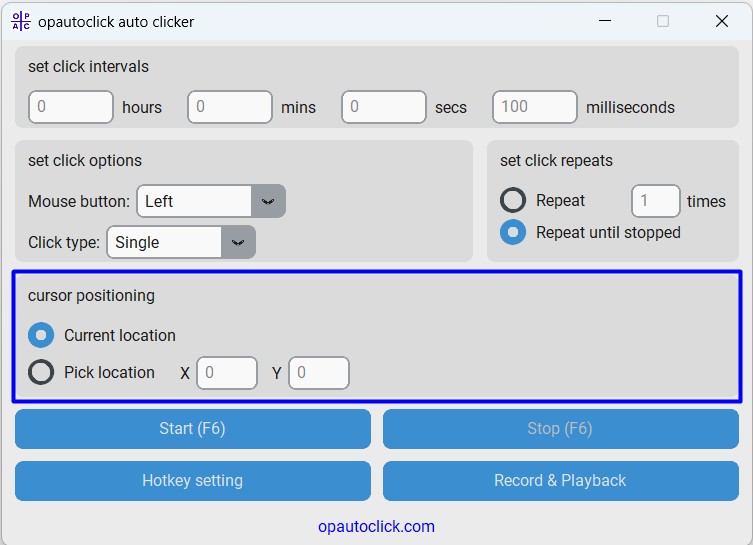
Cursor Positioning
Use the current cursor state or choose a specific location for the clicks. An opautoclick autoclicker allows you to easily select a location on your screen.
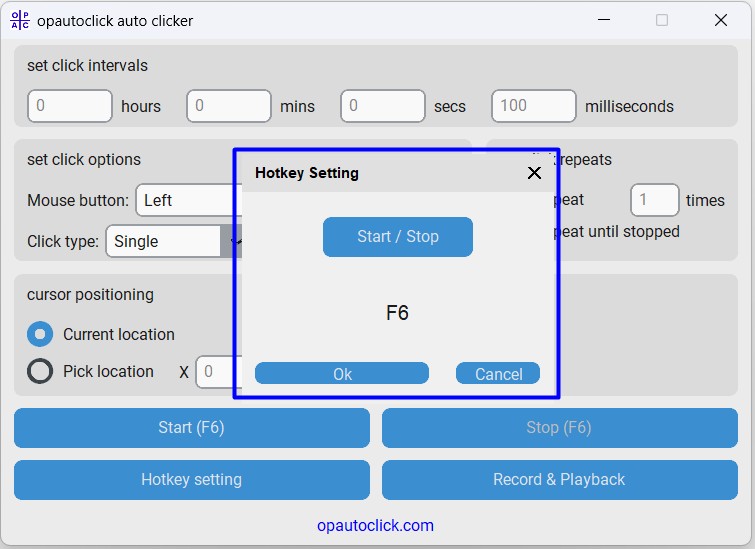
Quick toggling is made possible by setting and configuring a necessary hotkey on your keyboard to start and stop the auto-clicker.
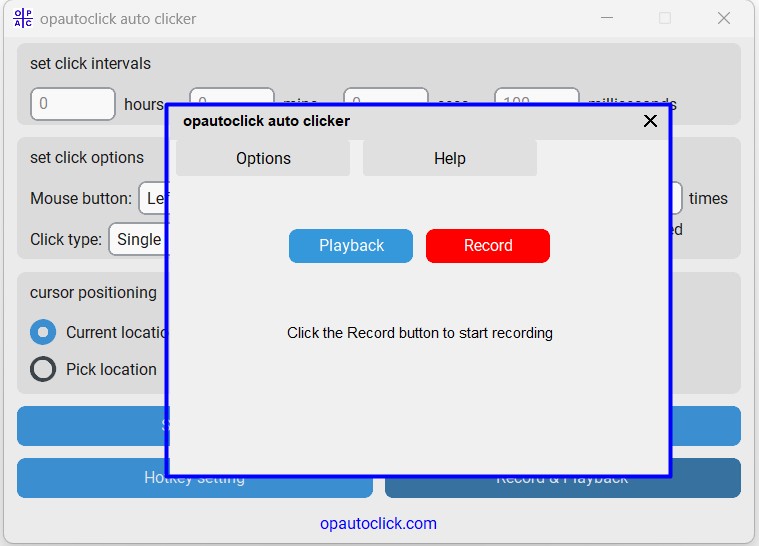
Record and Playback Settings
These settings enable you to record mouse clicks and replay them at your convenience. This feature helps automate sequences of clicks.
| Feature | Opautoclick Auto Clicker |
| Price | Completely Free |
| Installation Required | No (Portable) |
| Ease of Use | Very Easy |
| Click Precision | Millisecond control |
| Hotkey Support | Yes (Customizable) |
| Recording Feature | Yes (Record & Playback) |
| Multi-Location Clicking | Yes |
| Accessibility Features | Strong focus |
| System Tray Operation | Yes |
| Latest Update | 2026 |
System Requirements
| Component | Minimum Requirement | Recommended |
|---|---|---|
| Operating System | Windows 7, 8, 10, or 11 (32-bit or 64-bit) | Windows 10 or 11 (64-bit) |
| Processor (CPU) | Any modern 1 GHz processor | 1.5 GHz or faster |
| Memory (RAM) | 512 MB | 1 GB or more |
| Storage Space | Less than 5 MB free | 10 MB free space |
| Additional Software | .NET Framework 4.5 | .NET Framework 4.8 or later |
| Display | 800 x 600 screen resolution | 1024 x 768 or higher |
| Input Device | Mouse and keyboard | Mouse, keyboard (for hotkey use) |
How Does an AutoClicker Work?
- Setting Necessary Options: When the application first launches, you’ll be presented with a user friendly interface that allows you to select mouse buttons, define click intervals, and adjust other settings.
- Setting Click Intervals: You may adjust the frequency of clicks by using the spinboxes. Hours, minutes, seconds, and milliseconds can all be specified.
- Click Options Selection: Click the mouse button that best fits your needs.
- Selecting Repeat Options: Consider a target mode to click continuously on multiple points until you manually stop them or to repeat a predetermined number of times.
- Changing the Hotkey: Click the “Change HOTKEY” button to modify the hotkey that is currently used to start and stop the auto clicker.
- Cursor Position Selection: Use the “Pick a Location” feature to enter the desired coordinates and click at a specific location.
- Clicker Start: Once all settings are configured, press the “Start” button to initiate auto-clicking. You can stop it at any moment by using the “STOP” button or your assigned hotkey.
- Recording Actions: To record a series of clicks, click the “Record” button, open the “Record & Playback” window, and then take your desired actions. When you’re finished, stop the recording so you may listen to it later.
- Using the System Tray: To keep the application out of the way while maintaining access to its features, minimize it to the system tray.
Auto Clicker Applications: Gaming, Productivity & Accessibility
For a variety of gaming, professional, productivity, research, and system administration applications, it is a flexible tool. When utilized properly, it can enhance workflow for various jobs, increase productivity, and save time.
1. Gaming
In the gaming world, an autoclicker is like a dedicated co-pilot for the tedious parts of a journey, allowing you to focus on steering the game.
Use Cases:
Resource Farming: In MMORPGs (like Old School RuneScape) or ARPGs (like Diablo), players often need to defeat the same enemies hundreds of times to collect materials, gold, or experience. An auto-clicker can be programmed to repeatedly click on a monster or a resource node, automating this tedious grind.
Idle/Incremental Games: Games like Cookie Clicker or Adventure Capitalist are built around millions of clicks. It can massively accelerate progression by generating clicks at superhuman speeds, unlocking upgrades and achievements passively.
Crafting and Building: In many survival games like Minecraft, creating large structures or crafting hundreds of items from a stack of materials requires continuous clicking. Automating this process saves physical strain and time.
Menu Management: In complex strategy games, managing large armies or cities can involve repetitive menu navigation. Simple click macros can streamline these clickable tasks.
Benefits:
Prevents Physical Fatigue: During extended periods of gaming, it reduces the risk of hand injuries or repetitive strain injuries (RSI).
Time Efficiency: It allows you to enjoy the story, PvP, or cooperative aspects by unlocking gaming stuff that would otherwise require hours of pointless work.
Consistency: It performs actions with unwavering precision, ensuring optimal efficiency in tasks like rapid-firing a semi-automatic weapon in an FPS.
2. Productivity
For personal productivity in top-tier corporate event management companies, this macro acts as a simple automation tool that bridges the gap between manual effort and full-scale scripting.
Use Cases:
Bulk Operations: Downloading a gallery of images, saving multiple documents from a list, or clicking “next page” repeatedly to capture information from a paginated web list.
Automated Monitoring: Refreshing a web page every few seconds to monitor for a status change, such as a ticket sale going live, a delivery slot opening up, or a price drop.
Form Navigation: Automating clicks to move through multi-page forms or online surveys that lack a “save and return” feature.
Benefits:
Hands-Off Convenience: Once set up, it runs in the background, allowing you to work on another task or even step away from your computer without interrupting the process.
Saves Precious Time: It takes over small but cumulative tasks, reclaiming minutes or even hours in your day for more meaningful activities.
Reduces Mental Load: It removes the boredom and frustration associated with highly repetitive digital chores.
3. Professional Use
In professional environments, auto clickers serve as lightweight macro tools for testing and workflow simplification where dedicated software is unavailable or overkill.
Use Cases:
Software Quality Assurance (QA): Testers can utilize it to perform repetitive user interface (UI) checks in softwares such as ERP Software, CRM Softwares, also perform clicking a button thousands of times to test for memory leaks or application stability.
Data Migration: Inputting data from a source document into a legacy software system that doesn’t support bulk import or database integration.
Demo and Kiosk Automation: Powering an interactive kiosk or running an automated software demonstration by automatically navigating through slides, menus, or features on a timed loop.
Benefits:
Error Reduction: It removes the human error factor from mind-numbingly repetitive data tasks, ensuring 100% consistency in every action.
Cost-Effective Automation: It provides a straightforward approach to automation without eliminating the need for expensive software or custom-coded solutions.
Focus on High-Value Work: It frees up employees—from admins to engineers—to apply their skills to complex problem-solving and innovation instead of manual data entry.
4. Research and Data Analysis
Researchers often use auto-clickers as a practical tool for data gathering when more advanced methods are unavailable.
Use Cases:
Web Scraping and Data Collection: Extracting public data from websites that have anti-scraping measures that block automated bots. A humanized click pattern can sometimes circumvent these basic protections.
Database Navigation: Systematically moving through the pages of an online public archive, academic journal, or government database that requires manual clicking to access records.
Simulation and Testing: Automating user interactions to generate data for human-computer interaction (HCI) studies or to stress-test a web application’s front end.
Benefits:
Accesses Hard-to-Reach Data: It enables the collection of valuable datasets from sources that aren’t API-friendly.
Scalability: It enables the collection of a large sample size from a manual-click interface, making it a feasible task for a single researcher.
Accuracy: It ensures the data collection process is methodical and repeatable, reducing inconsistencies introduced by manual fatigue.
5. IT Administration
For IT professionals, auto clickers are a handy utility for managing repetitive system tasks across multiple environments.
Use Cases:
Software Deployment/Configuration: Automating the clicks needed to install or configure software on multiple machines, especially when silent install commands aren’t available.
Repetitive System Checks: Logging into multiple systems or network devices via a GUI (Graphical User Interface) to check statuses when command-line access isn’t configured.
User Simulation: Generating basic user activity on a test network to simulate load or verify firewall and access rules are working correctly.
Benefits:
Ensures Configuration Consistency: It guarantees that the same sequence of actions is performed on every machine, eliminating configuration drift caused by manual error.
Saves Administrative Time: It drastically reduces the time spent on mundane, repetitive maintenance tasks across a fleet of computers.
Reliability: It performs predictable, precise actions, which are crucial for testing and validation processes in IT environments.
6. Accessibility and Assistive Technology
Autoclickers can be transformed from a simple productivity tool into a critical piece of assistive technology, serving as a vital bridge for individuals with physical disabilities.
Use Cases:
Alternative Input Method: For users with conditions like limited mobility, arthritis, carpal tunnel syndrome, or neuromuscular disorders, performing repeated mouse clicks can be painful, difficult, or impossible. It enables them to initiate a sequence of clicks with a single, simpler action—such as pressing a single keyboard key, a foot pedal, or a switch device configured to the “start” hotkey.
Dwell Clicking: While dedicated accessibility software often includes “dwell clicking” (where the cursor pauses over an item to click), a standalone auto clicker can provide a simpler, lightweight alternative. A user could move the cursor to a desired location and use a custom hotkey to trigger a single click or a pre-configured double-click, significantly reducing the physical effort required to interact with a computer.
Reducing Fatigue: For anyone experiencing temporary or permanent fatigue, an auto clicker can make the difference between being able to use a computer effectively or not. It mitigates the strain of continuous clicking, making computing sessions longer and more comfortable.
Benefits:
Promotes Digital Inclusion: It empowers individuals with physical limitations to use a computer for work, education, communication, and entertainment with greater independence and less discomfort.
Customizable Support: The ability to finely tune the click interval, type, and location means the tool can be adapted to a user’s specific skills and needs, providing a personalized level of support.
Low-Cost Solution: Many robust auto clickers are free or very low-cost, making this form of assistive technology highly accessible compared to some specialized software and hardware.
Ease of Use: The intuitive nature of most auto clickers means they can be set up and used without needing advanced technical knowledge, which is crucial for users who may already face barriers to technology.
Benefits of Using an Auto Clicker on PC
It is more than just a simple automation software; it’s a practical solution that makes interacting with your computer easier, healthier, and more efficient. Here’s how it can genuinely improve your digital experience:
- Save Time and Your Sanity: By automating mindless clicking tasks it gives you the gift of time. Instead of manually submitting hundreds of forms or grinding for game resources, you can focus on more engaging and meaningful work—or take a well-deserved break.
- Work Smarter, Not Harder: It boosts your efficiency by handling the tedious, repetitive processes. This enables you to focus your energies on strategic and creative tasks, significantly increasing your overall productivity.
- Protect Your Well-being: Constant clicking can lead to physical strain, fatigue, and even repetitive stress injuries, such as carpal tunnel syndrome. An auto clicker serves as an ergonomic assistant, taking over repetitive motions and allowing you to work or play comfortably for more extended periods.
- Gain a Customizable Helper: Whether you need a slow, steady click every few seconds or a rapid-fire burst, you’re in control. The ability to fine-tune timing, duration, and location means the tool adapts to your specific needs, not the other way around.
- Promote Accessibility: For individuals with disabilities who find using a mouse challenging, an auto-clicker can be a powerful accessibility tool. It provides a more straightforward way to interact with software, helping to create a more inclusive computing environment.
- Simplify Complex Tasks: Beyond simple clicks, many auto clickers can record and playback sequences of actions. This allows professionals to automate entire workflows for software testing, data entry, or presentation demos, ensuring perfect consistency every time.
- Easy and Accessible: Best of all, many robust auto clickers are free to use and designed with intuitive interfaces. You don’t need to be a tech wizard to start automating your tasks and enjoying these benefits right away.
Troubleshooting Common OP Auto Clicker Issues
Issue: Clicks Not Registering in Specific Applications
Solutions:
Run as Administrator: Right-click OP Auto Clicker → “Run as administrator”
Adjust Compatibility Mode: Properties → Compatibility → Windows 8 compatibility
Change Click Method: Try different click types (some applications require specific click methods)
Issue: Antivirus Software Blocking the Application
Solutions:
Add Exception: Add OP Auto Clicker to your antivirus list
Temporary Disable: Disable antivirus during download/initial run
Use Portable Version: The portable version often triggers fewer warnings
Issue: Hotkeys Not Working
Solutions:
Check Conflicts: Ensure your hotkey isn’t used by another application
Simple Hotkeys: Use combinations like F9, F10, or Ctrl+Shift+[Letter]
Reassign: Change to a different hotkey combination
Issue: Clicks at Wrong Screen Position
Solutions:
Check Screen Resolution: Ensure coordinates match your current resolution
Multi-Monitor Setup: Account for all displays in your coordinate calculation
Relative vs. Absolute: Determine if the application uses relative or absolute positioning
Types of AutoClickers
We have enlisted some of the best picks for you-
Auto clicker for Windows
Windows Autoclicker is a fantastic automation tool. This is the best auto clicker for windows 10 having features like an intuitive UI, hotkey customization, and a macro recorder. In addition, single, double, triple clicking and left and right clicks are supported.
Auto clicker for MAC
A sophisticated program, MAC autoclicker, can help you save time and effort by automating repetitive clicks on your Mac OS. One of the greatest auto-clickers of 2025, it offers users a variety of features, such as customizable clock speed and auto-clicking on particular screen coordinates.
Auto clicker for Android
The Android Autoclicker Automatic Tap utility mimics repeatedly tapping the screen of your Android smartphone. You can do tap operations at any point and set the necessary interval. You may set up and activate the auto clicker with the tool's floating icon. Its user-friendly design allows you to swipe and click many times.
Most Used Auto Clickers
Opautoclicker or OP Auto Clicker 3.0
OP Autoclicker 3.0 is a flexible modes of auto click software that supports both single and double clicks. It is compatible with Windows and offers customizable click intervals and hotkey functionality. Let’s download op auto clicker.
OP Auto Clicker 4.0
It is the latest version of opautoclicker which consists of full fledged configuration options. This tool is also compatible with Windows with an intuitive UI.
Ready for More?
Next Steps:
Questions and Answers
Generally, autoclickers are safe automation software. Employing one in single-player games is typically acceptable, but using it to gain an unfair advantage in multiplayer or competitive games. So, use them responsibly.
Most autoclickers have a straightforward process to initiate, typically a designated “Start” button or a customizable hotkey, which is F6 by default. You need first to set your desired click interval settings and location on the screen. Once all these options are configured, you press the assigned keyboard key or button to start the automated clicking.
Yes, absolutely! Both Android and iOS devices have auto-clicking functionality. Android users can get autoclick apps on the Google Play Store or use built-in accessibility features. iOS users typically utilize the Switch Control feature within the phone’s Accessibility settings to create automated tap gestures. Alternatively, you can install an auto-clicker on iOS.
If you are looking to auto-click on Roblox, consider trying Roblox Auto Clicker. It is a macro that can automate gaming tasks according to specific requirements. However, it is advised to use it responsibly, considering the game rules.
The latest version is entirely dependent on the specific autoclicker software you are using. For instance, popular options like “OP Auto Clicker” or “GS Auto Clicker” have different version numbers. You should always check the developer’s official website or the app store listing for the most current and secure update.
Yes, completely free with no trial periods, subscription fees, or feature limitations. We believe in accessible automation tools.
Currently, OP Auto Clicker specializes in mouse automation. For keyboard automation, we recommend combining with dedicated keyboard macro software for full automation solutions.
OP Auto Clicker is designed for Windows (10, 11, and earlier versions). Mac and Linux users can explore compatibility layers like Wine or look for native auto clickers for their platforms.
Our recording function captures actual mouse movements and clicks with timing precision. You can then edit the sequence, adjust timing between actions, and save it for repeated use with one click.
No technical limit. OP Auto Clicker can perform clicks indefinitely or until you specify a finite number. The only practical limit is your computer’s uptime.
While OP Auto Clicker doesn’t have built-in scheduling, you can use Windows Task Scheduler to launch pre-configured clicking sequences at specific times.